手动cerbot安全访问nginx+ubuntu
背景:
nginx上的图片地址, 在浏览器中访问正常 但是作为图片链接方式给到
typora中, 却不显示
一个博主和一个网友的主要思想是: 网络安全的问题, 因此服务器尝试启用HTTPS, 看能否解决这个问题
SSL(安全套接层)证书对于网站和在线服务来说非常重要
该证书通过加密用户和服务器之间的通信, 保护数据不被窃听或篡改
而 Cerbot 工具可以帮我们 免费申请到SSL证书
Cerbot介绍
一款开源自动化工具, 获取和续订由 Lets Encrypt 提供的免费 SSL/TSL 证书
Let's Encrypt 是一个由互联网安全研究小组(ISRG)运营的证书颁发机构(CA)
提供自动化流程来生成和更新证书, 便于管理员轻松为站点启用
HTTPS
- Cerbot 主要特点
- 自动化: 自动验证域名所有权, 并申请证书
- 免费: 使用
Lets Encrypt提供的免费证书 - 兼容: 支持多种服务器, 包括自己使用的 Nginx
- 易用: 提供命令行
- 续订: 自动处理证书的续订, 确保HTTPS连接始终有效
Lets Encrypt提供的免费证书, 有效期90天
ubuntu安装Cerbot
Snap 是 Certbot 官方推荐的安装方式,尤其是针对长期支持的 Ubuntu 版本
sudo apt update
sudo apt install certbot

cerbot --version # 查询版本号
证书申请与启用
-
执行命令
certbot certonly -d img.eksnotebook.com --manual --preferred-challenges dns --server https://acme-v02.api.letsencrypt.org/directory-d后面跟的主域名- 这里如果你的网站使用子域名, 可能需要另外添加, 待后续深入研究
-
输入邮箱后回车
# 输入邮箱
Saving debug log to /var/log/letsencrypt/letsencrypt.log
Enter email address (used for urgent renewal and security notices)
(Enter 'c' to cancel): xxx@qq.com. # 这里输入你的邮箱 -
输入两次
Y- - - - - - - - - - - - - - - - - - - - - - - - - - - - - - - - - - - - - - - -
Please read the Terms of Service at
https://letsencrypt.org/documents/LE-SA-v1.4-April-3-2024.pdf. You must agree in
order to register with the ACME server. Do you agree?
- - - - - - - - - - - - - - - - - - - - - - - - - - - - - - - - - - - - - - - -
(Y)es/(N)o: Y # 输入 Y
- - - - - - - - - - - - - - - - - - - - - - - - - - - - - - - - - - - - - - - -
Would you be willing, once your first certificate is successfully issued, to
share your email address with the Electronic Frontier Foundation, a founding
partner of the Let's Encrypt project and the non-profit organization that
develops Certbot? We'd like to send you email about our work encrypting the web,
EFF news, campaigns, and ways to support digital freedom.
- - - - - - - - - - - - - - - - - - - - - - - - - - - - - - - - - - - - - - - -
(Y)es/(N)o: Y # 输入 Y
Account registered.
Requesting a certificate for *.runoob.com -
输出如下信息, 移步域名后台填写信息
Account registered.
Requesting a certificate for *.runoob.com

- - - - - - - - - - - - - - - - - - - - - - - - - - - - - - - - - - - - - - - -
Please deploy a DNS TXT record under the name:

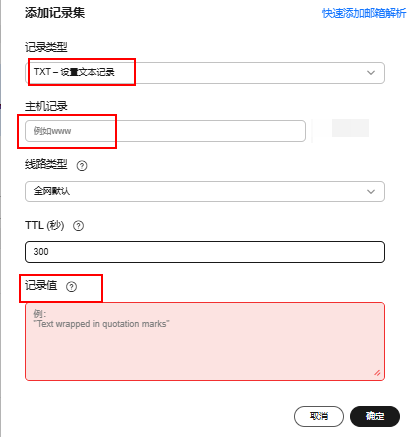
xxxxxxx.runoob.com. # 这里需要设置域名解析的主机记录, 参考下图

with the following value:

aIwqY00CZtziVwr-xxxxxxxxxxxxxx  # 这里是域名解析的记录值,参考下图

Before continuing, verify the TXT record has been deployed. Depending on the DNS
provider, this may take some time, from a few seconds to multiple minutes. You can
check if it has finished deploying with aid of online tools, such as the Google
Admin Toolbox: https://toolbox.googleapps.com/apps/dig/#TXT/_acme-challenge.runoob.com.
Look for one or more bolded line(s) below the line ';ANSWER'. It should show the
value(s) you've just added. -
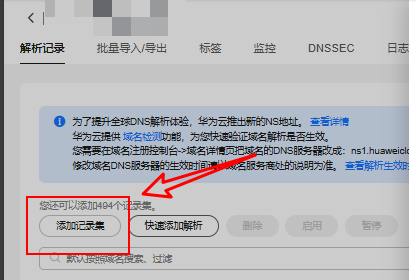
我是在华为云购买的域名, 找到
添加记录集点击后将如上信息添加到弹出窗口内
-
选择记录类型为
TXT, 将如上信息的主机记录和记录值分别填入下方框内
-
填好点击确定, 然后回到操作系统, 点击回车,验证通过
Press Enter to Continue
# 参考下图设置完域名解析后,按回车就可以生成了
# 记住一定要先解析设置完成后再回车,然后生成的证书信息如下:

Successfully received certificate.
Certificate is saved at: /etc/letsencrypt/live/runoob.com/fullchain.pem # 该路径会在Nginx配置中使用
Key is saved at:         /etc/letsencrypt/live/runoob.com/privkey.pem # 该路径会在Nginx配置中使用
This certificate expires on 2024-12-27.
These files will be updated when the certificate renews.

NEXT STEPS:
- This certificate will not be renewed automatically. Autorenewal of --manual certificates requires the use of an authentication hook script (--manual-auth-hook) but one was not provided. To renew this certificate, repeat this same certbot command before the certificate's expiry date.

- - - - - - - - - - - - - - - - - - - - - - - - - - - - - - - - - - - - - - - -
If you like Certbot, please consider supporting our work by:
 * Donating to ISRG / Let's Encrypt:   https://letsencrypt.org/donate
 * Donating to EFF:                    https://eff.org/donate-le
- - - - - - - - - - - - - - - - - - - - - - - - - - - - - - - - - - - - - - - - -
此时域名的证书便验证通过了, 之后回到域名管理平台, 将 ==记录值删除==
-
此时域名的证书便验证通过了, 之后回到域名管理平台, 将 ==记录值删除==
-
另外, 如果你有多个域名, 需要自行备份验证文件
证书手动续期
Lets Encrypt提供的免费证书, 有效期90天
certbot renew会生成新的记录值, 继续在域名后台更新即可
证书自动续期
Nginx配置SSL
配置思路:
- 添加443监听端口, http转https
- 配置证书目录
/etc/nginx/nginx.conf
user root;
worker_processes auto;
error_log /var/log/nginx/error.log;
pid /run/nginx.pid;
# Load dynamic modules. See /usr/share/doc/nginx/README.dynamic.
include /usr/share/nginx/modules/*.conf;
events {
worker_connections 1024;
}
http {
gzip on; # 启用 gzip 压缩
gzip_vary on; # 根据请求中的 `Accept-Encoding` 响应头决定是否启用 gzip
gzip_proxied any; # 在所有代理请求中启用压缩
gzip_types text/plain text/css application/json application/javascript text/xml application/xml application/xml+rss text/javascript; # 指定哪些类型的响应需要压缩
gzip_comp_level 5; # 压缩等级(范围是 1-9,高级别意味着更好的压缩但会消耗更多 CPU 资源)
gzip_min_length 256; # 只对超过给定长�度的响应启用压缩
log_format main '$remote_addr - $remote_user [$time_local] "$request" '
'$status $body_bytes_sent "$http_referer" '
'"$http_user_agent" "$http_x_forwarded_for"';
access_log /var/log/nginx/access.log main;
sendfile on;
tcp_nopush on;
tcp_nodelay on;
keepalive_timeout 65;
types_hash_max_size 4096;
include /etc/nginx/mime.types;
default_type application/octet-stream;
# Load modular configuration files from the /etc/nginx/conf.d directory.
# See http://nginx.org/en/docs/ngx_core_module.html#include
# for more information.
include /etc/nginx/conf.d/*.conf;
charset utf-8;
# Settings for a TLS enabled server.
}
/etc/nginx/conf.d/*.conf
-
sudo cp default.conf home.conf- 复制默认文件 -
sudo rm default.conf- 删除默认文件 -
配置
home.confserver {
listen 80;
server_name img.eksnotebook.com;
# server_name img.eksnotebook.com www.img.eksnotebook.com;
#配置https重定向
return 301 https://$host$request_uri;
}
server{
listen 443 ssl http2;
listen [::]:443 ssl http2;
server_name img.eksnotebook.com www.img.eksnotebook.com;
#access_log /var/log/nginx/host.access.log main;
location / {
root /usr/share/nginx/html;
index index.html index.htm;
}
location /images {
alias /images;
# autoindex on;
}
#error_page 404 /404.html;
# redirect server error pages to the static page /50x.html
#
error_page 500 502 503 504 /50x.html;
location = /50x.html {
root /usr/share/nginx/html;
}
# ==============================
# 新增HTTPS访问
#error_page 404/404.html;
ssl_certificate "/etc/letsencrypt/live/img.eksnotebook.com/fullchain.pem"; # 生成证书过程提示信息
ssl_certificate_key "/etc/letsencrypt/live/img.eksnotebook.com/privkey.pem"; # 生成证书过程提示信息
ssl_protocols TLSv1.1 TLSv1.2 TLSv1.3;
ssl_ciphers ECDHE-RSA-AES128-GCM-SHA256:ECDHE:ECDH:AES:HIGH:!NULL:!aNULL:!MD5:!ADH:!RC4;
# ssl_ciphers EECDH+CHACHA20:EECDH+CHACHA20-draft:EECDH+AES128:RSA+AES128:EECDH+AES256:RSA+AES256:EECDH+3DES:RSA+3DES:!MD5;
# ssl_ciphers HIGH:!aNULL:!MD5;
# 自定义设置使用的TLS协议的类型以及加密套件(以下为配置示例,请您自行评估是否需要配置)
# TLS协议版本越高,HTTPS通信的安全性越高,但是相较于低版本TLS协议,高版本TLS协议对浏览器的兼容性较差。
ssl_prefer_server_ciphers on;
ssl_session_cache shared:SSL:10m;
ssl_session_timeout 10m;
# HTTPS end
# ==============================
# proxy the PHP scripts to Apache listening on 127.0.0.1:80
#
#location ~ \.php$ {
# proxy_pass http://127.0.0.1;
#}
# pass the PHP scripts to FastCGI server listening on 127.0.0.1:9000
#
#location ~ \.php$ {
# root html;
# fastcgi_pass 127.0.0.1:9000;
# fastcgi_index index.php;
# fastcgi_param SCRIPT_FILENAME /scripts$fastcgi_script_name;
# include fastcgi_params;
#}
# deny access to .htaccess files, if Apache's document root
# concurs with nginx's one
#
#location ~ /\.ht {
# deny all;
#}
} -
复制home.conf到images.conf, 并修改访问路径location /images {
alias /images/;
autoindex on;
} -
重启
nginx -s reload
访问验证
- 验证
https://img.eksnotebook.com/通过 - 验证
https://img.eksnotebook.com/images访问拒绝
分析https:...images失败
-
尝试修改
images.conf配置文件为--==失败==location /images {
root /images/;
autoindex on;
} -
尝试把
home.conf内修改为images路径--==成功==location / {
root /images/;
autoindex on;
# root /usr/share/nginx/html;
# index index.html index.htm;
} -
最后我把根目录和图床目录放到了一个配置文件夹中
目前推测, 一个域名对应一个配置文件
否则会有冲突
删除上述
images.conf文件 -
尝试修改
home.conf中location--==失败==location /images {
root /images/;
autoindex on;
# root /usr/share/nginx/html;
# index index.html index.htm;
}
问题原因: nginx+https无法访问到二级地址
Fitten Code:
配置文件错误 确保Nginx配置文件中正确配置了SSL证书和二级路径。
server {
listen 443 ssl;
server_name example.com;
ssl_certificate /path/to/your/certificate.crt;
ssl_certificate_key /path/to/your/private.key;
location / {
root /var/www/html;
index index.html index.htm;
}
location /subpath {
alias /var/www/html/subpath;
index index.html index.htm;
}
}确保二级路径对应的文件路径正确,并且文件存在
重定向问题 如果配置了重定向,确保重定向不会导致二级路径无法访问
server {
listen 80;
server_name example.com;
return 301 https://$server_name$request_uri;
}缓存问题 有时浏览器或CDN缓存可能导致无法访问二级路径,尝试清除缓存或使用无痕模式访问
防火墙或安全组配置 确保防火墙或安全组允许HTTPS流量(443端口)通过 检查防火墙配置
sudo ufw status确保SSL证书配置正确,并且证书有效 检查证书
openssl s_client -connect example.com:443 -servername example.comNginx配置语法错误 检查配置文件语法正确否
sudo nginx -t查看Nginx错误日志,找出具体问题
sudo tail -f /var/log/nginx/error.log
二次验证通过
-
修改
home.conf修改同步到上方配置文件
location / {
root /usr/share/nginx/html;
index index.html index.htm;
}
location /images {
    alias /images/;
    autoindex on;
} -
验证通过, 完美解决 验证
https://img.eksnotebook.com/通过 验证https://img.eksnotebook.com/images通过